Introduction to DrawScript
This tutorial is intended to give you the skills necessary to:
Understand the elements of the DrawScript template
Be able to create and modify DrawScript programs
Create conditional rules in DrawScript
To follow along, download the Basic DrawScript Template.
You can download the completed tutorial file here: Tutorial 5.3dm.
Part 1: Anatomy of a DrawScript Program
In a previous tutorial, we covered rule sequences in-depth. Rule sequences are a tool for automation in Shape Machine, allowing you to specify both rules and the order in which Shape Machine will execute them on a design.
Rule sequences are the logical precursor to DrawScript, a Turing-Complete programming language interpreted by Shape Machine.
Elements of a DrawScript Program
DrawScript programs look very similar to Rule Sequences, but with a few key differences. Let’s take a look at the basic structure of a DrawScript program:
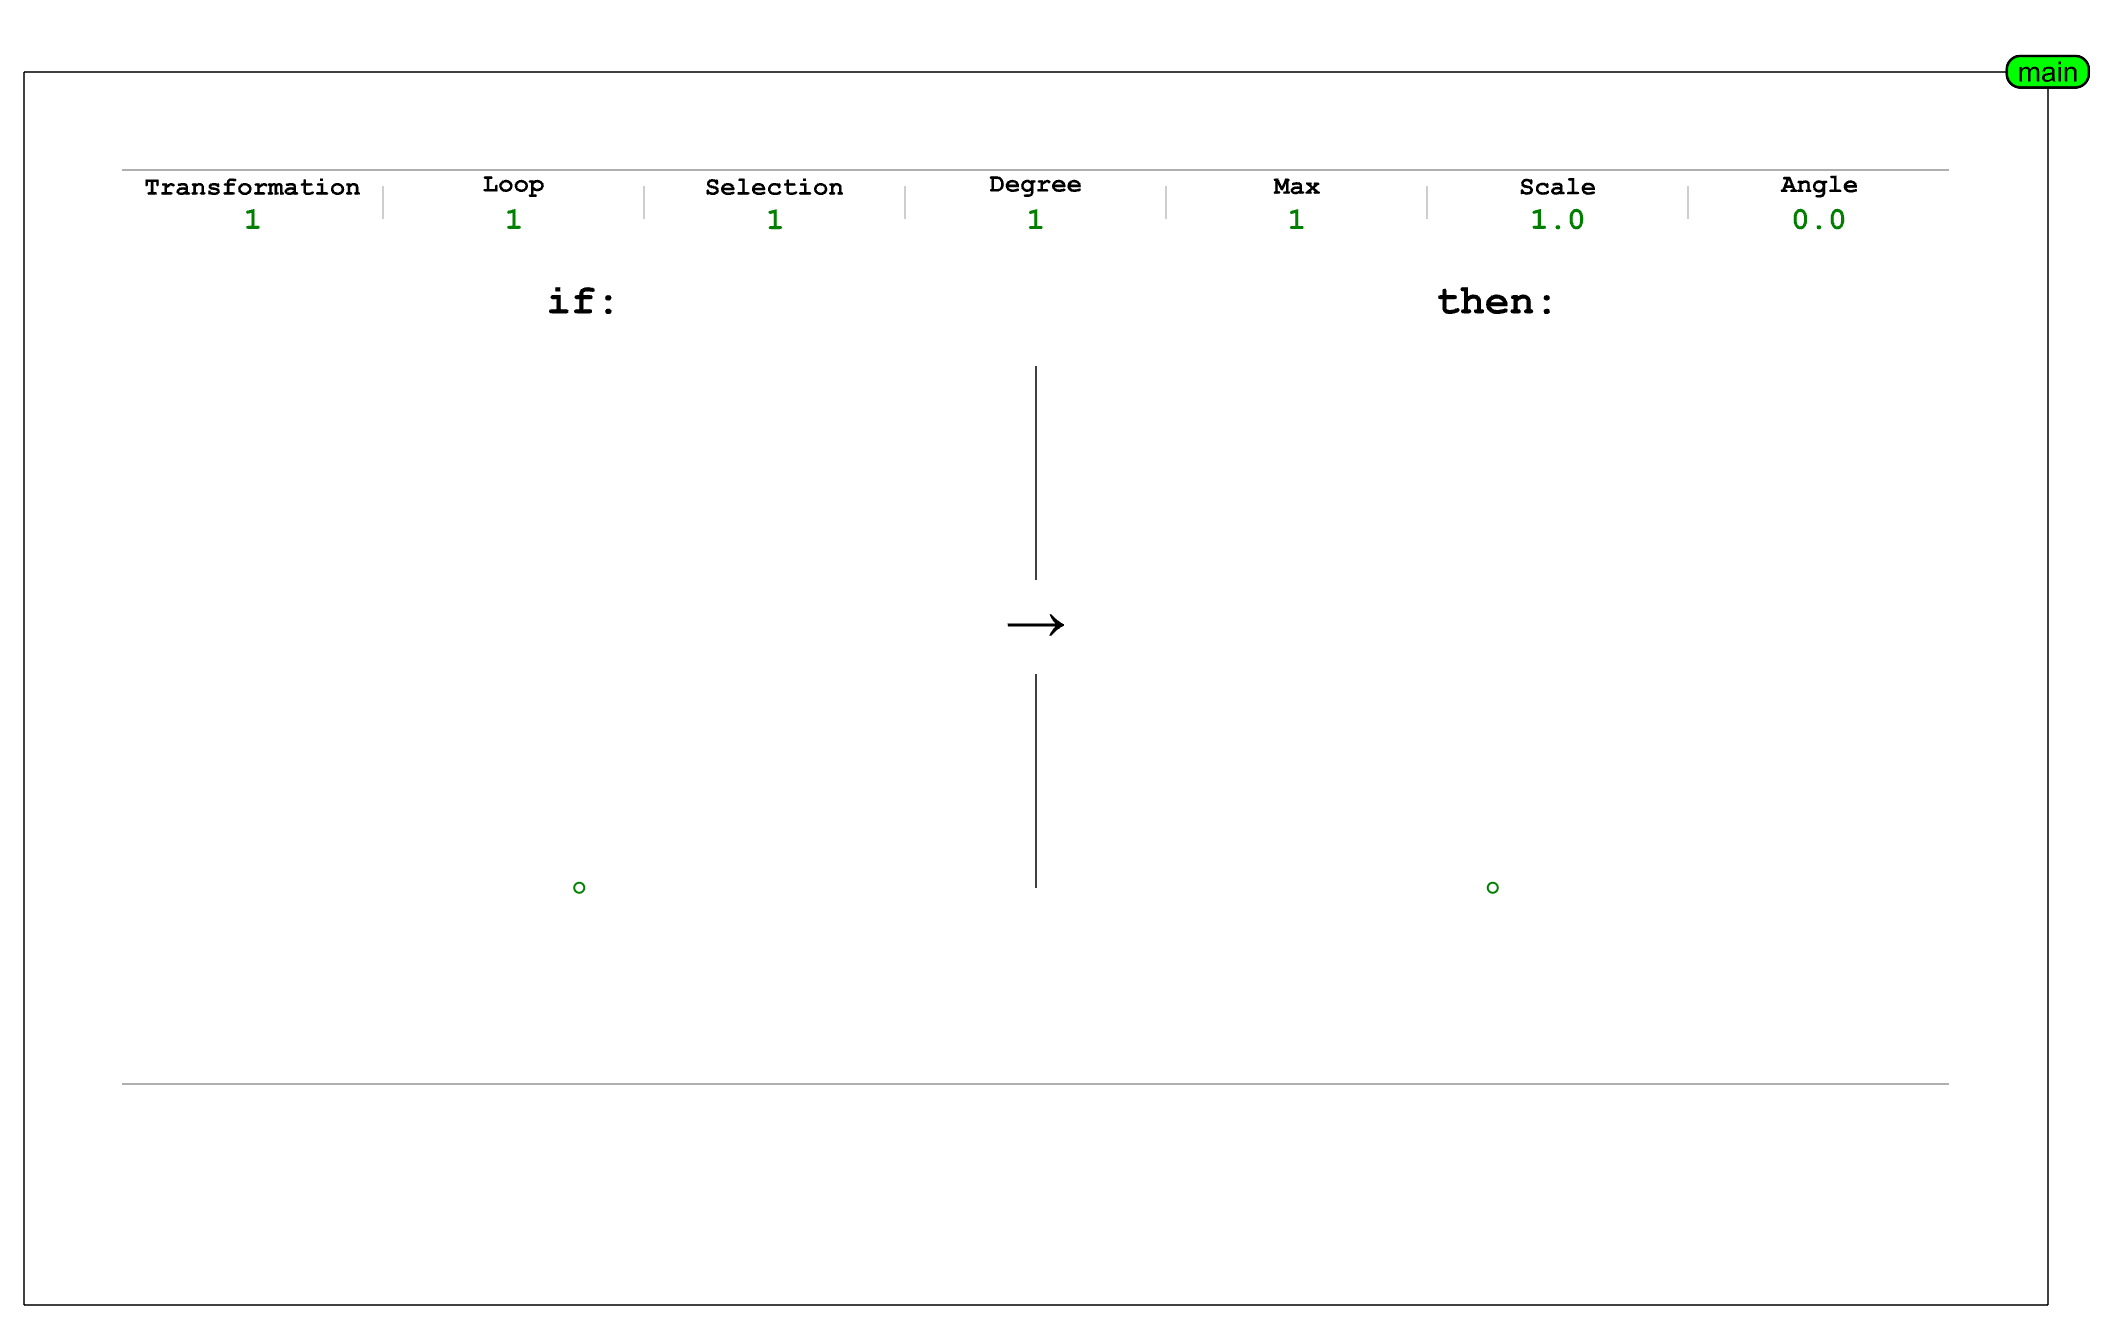
DrawScript programs are organized into named blocks. Blocks contain a single rule sequence and are
labeled by a TextDot in the top right corner.
Like rule sequences, DrawScript also requires the top line over the first rule and the bottom line over the last rule. However, unlike rule sequences, DrawScript must be organized into these named blocks, each with their own label. Unlabeled blocks are ignored by Shape Machine.
Key Components:
Blocks: Encapsulated sequences of rules labeled with a
TextDot.Rules: Individual instructions within a block.
Jump Rules: Special rules that control the flow by jumping between blocks.
Creating a New Block
To create a new named block:
Copy an Existing Block: Select an existing block, including its horizontal lines and label, and copy it.
Rename the Block: Change the name of the block by editing the text in the
TextDotlabel.Double-click the label to edit it directly.
Alternatively, select the label and edit the text in the properties panel.
Tip: Editing labels in Rhino
To easily edit a label in Rhino, double-click slightly offset of the label to the top-right.
Show demo
Jumping Between Blocks
The key feature that distinguishes DrawScript from rule sequences (and what makes it Turing-Complete)
is a new type of rule called a jump rule. Instead of having shapes on both sides of the rule like a replacement
rule, jump rules reserve the right-hand side for a TextDot label that specifies the jump target.
When Shape Machine reaches a jump rule, it will switch over to the block that matches the rule’s jump target, executing that block’s rules. Once it reaches the end of the jumped-to block, it will return to the jumped-from block and continue running any remaining rules in that block.
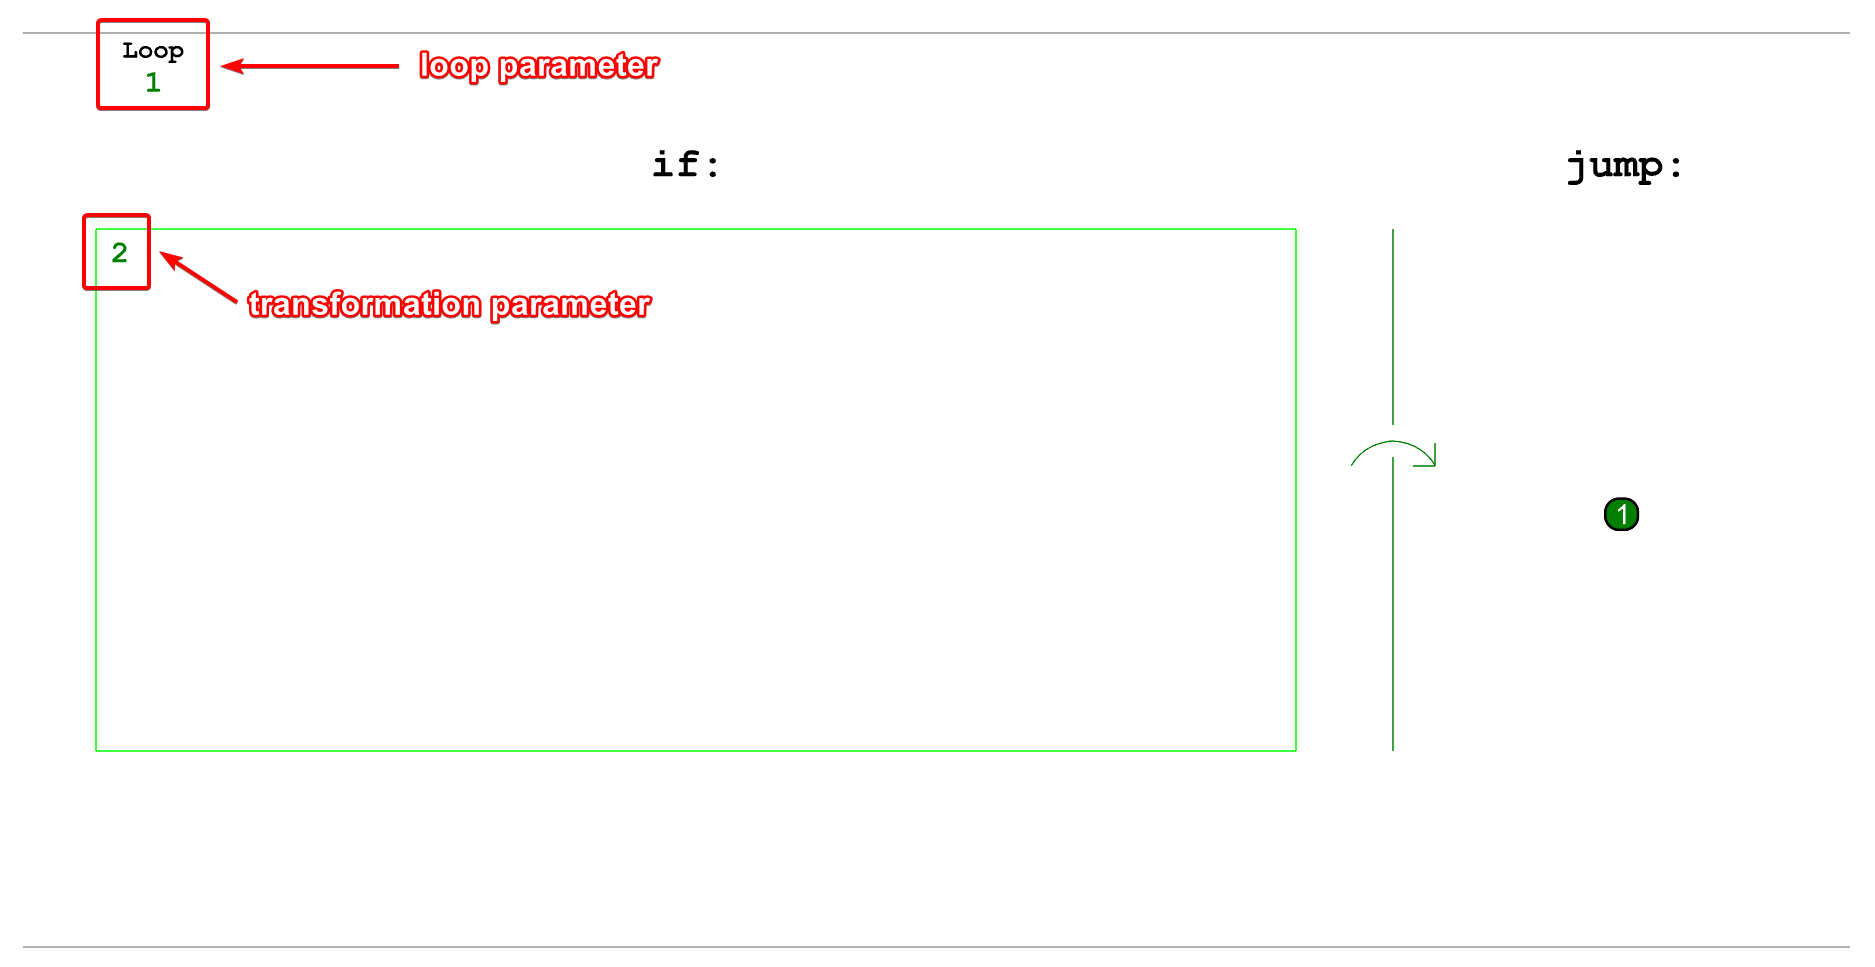
- Jump Rule Structure:
Left-Hand Side (LHS): May contain conditional queries (covered later).
Right-Hand Side (RHS): Contains a
TextDotlabel specifying the jump target block.Loop Parameter: Determines how many times to execute the jump.

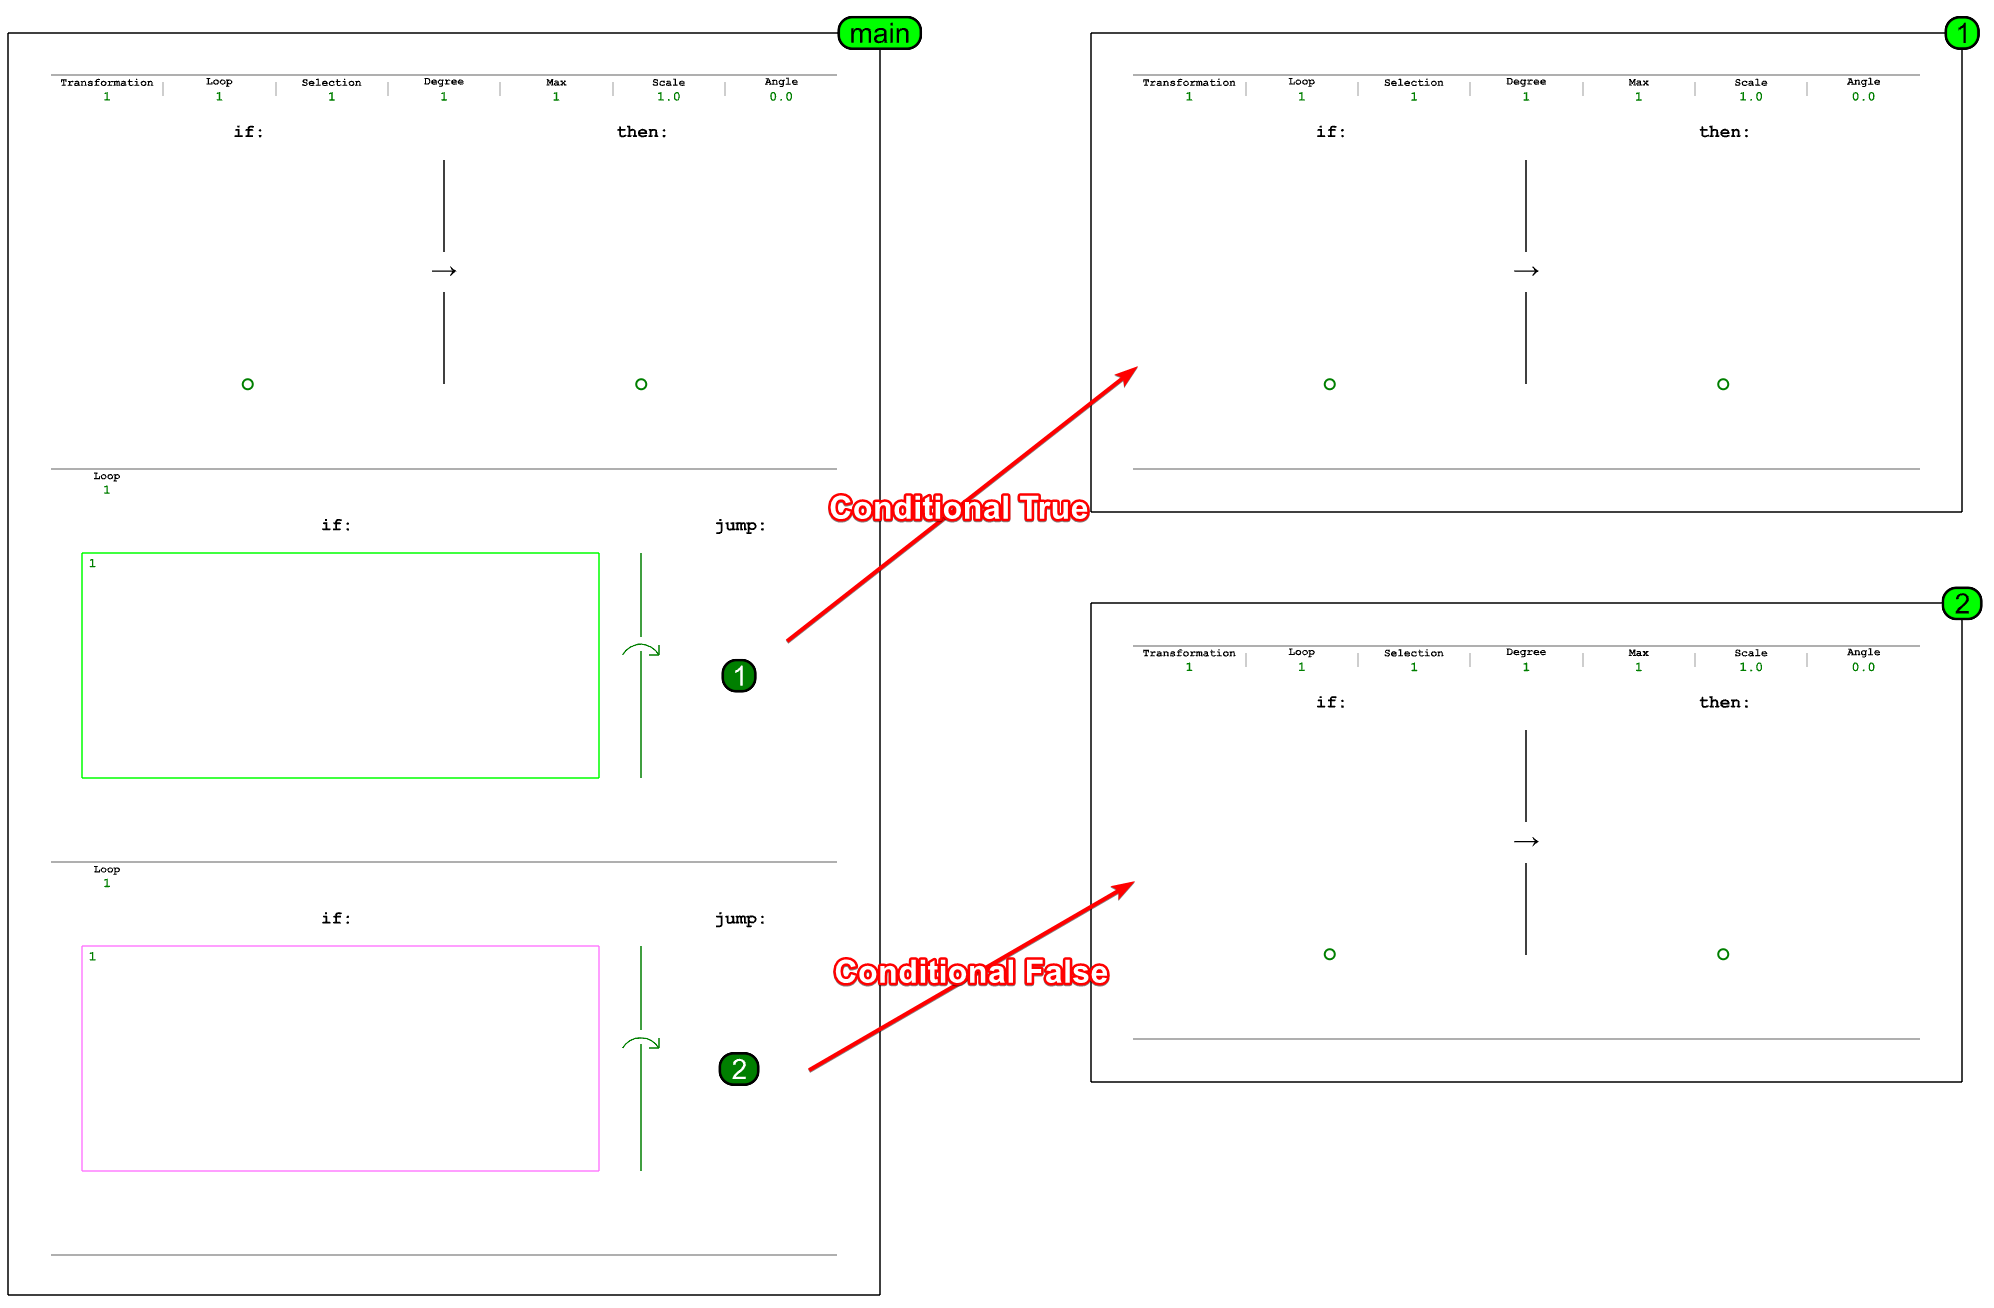
The image above shows a simple DrawScript program that does nothing. If Shape Machine were to execute it, it would do the following:
Enter block
mainRun the first rule in block
main(no-op)Jump to block
1via the jump rule in blockmainRun the first rule in block
1(no-op)Reach the end of block
1, return to blockmainReach the end of block
main, end program
As seen in the example image, jump rules have a loop parameter. This parameter tells Shape Machine
how many times to take the jump. Each subsequent jump only occurs after Shape Machine has completed
the block it jumped to and returns to the original block. This allows for the repetition of full
sequences in their entirety.
With jump rules, DrawScript blocks become similar to routines or functions that you encounter in traditional programming. As such, this tutorial and future tutorials might refer to blocks as routines or functions. By considering blocks to be routines, the implications for code reuse becomes apparent.
Program Entrypoints
Your DrawScript program must have an entrypoint. This is the block Shape Machine
will execute first, i.e. where execution begins.
In the above example, this entrypoint is main.
When determining which block to use as the entrypoint, Shape Machine does the following:
If there is a block labeled
0, that block is the entrypoint. Otherwise,If there is a block labeled
main, that block is the entrypoint. Otherwise,If there is only one block in the program, that block is the entrypoint. Otherwise,
Shape Machine will ask the user to enter the name of the block to use as the entrypoint.
Warning
DO NOT use spaces when naming your blocks if you don’t have a 0 block or main block.
Rhino will not let you use spaces when providing Shape Machine with the name of the
block to use as the entrypoint. This will result in a deadlock, and you will need to restart Rhino.
Besides excluding spaces, you can name a block whatever you’d like.
Theoretical Computer Science Details
DrawScript is a Turing-Complete programming language, meaning it can theoretically compute anything your phone can, and vice-versa. Obviously, it will not be as fast, and it may not be as easy to write a program to do the same thing that your phone might do, but you may be surprised to know that some problems become much easier when programming in DrawScript.
This is all made possible with the introduction of jump rules and conditional jump rules (see the next section). Without these, rule sequences are equivalent in power to a linear bounded automaton.
Implementation Details
Jumps in DrawScript are implemented very similarly to jumps in an assembly language or
bytecode. Internally, all DrawScript blocks are stored within a dict,
using their labels as keys and rule sequences as values.
Shape Machine starts executing the program by pushing all of the rules in the entrypoint
sequence into a dequeue, in the order in which they should be executed. As long
as this dequeue has rules to execute, Shape Machine will pull the first rule and execute it.
The elements of the dequeue appear as ((rule, loops left), rule number, block label) triples.
With this, running a program looks like:
rule_dequeue = [
    (val, i, entrypoint)  # val here is a (rule, loop_count) tuple
    for i, val in enumerate(program[entrypoint].rules, start=1)
]
while len(rule_dequeue) > 0:
    (rule, loops_left), i, block_label = rule_dequeue.pop(0)
    # i and block_label are used to report which rule is currently being run and in what block

    if loops_left > 1:
        rule_dequeue.insert(0, ((rule, loops_left - 1), i, block_label))

    if isinstance(rule, JumpRule):
        # Push all rules in the target block to the front of the dequeue
        rule_dequeue = [
            (val, i, rule.jump_target)
            for i, val in enumerate(
                program[rule.jump_target].rules, start=1
            )
        ] + rule_dequeue
    else:
        # Apply the replacement rule
        apply_rule(rule)
Part 2: Practice Exercise: Creating a Nested Squares Program
Exercise 1: Multi-Colored Nested Squares
In this exercise, we’ll create a sequence that nests squares iteratively, alternating colors between each level.
Step-by-Step Guide
Set Up the Main Block:
Open the
Basic DrawScript Template.3dmfile.Locate the block labeled
main.- Add a jump rule in the
mainblock: LHS: Leave empty.
RHS: Place a
TextDotwith the label of the target block (e.g.,nest_squares).Loop Parameter: Set to
3to repeat the jump three times.
- Add a jump rule in the
Create the Nesting Block:
Copy the empty block and rename it to match the jump target (e.g.,
nest_squares).First Rule:
LHS: Draw a black square.
RHS:
Copy the black square.
Change the outer square’s layer to green.
Draw a smaller black square inside, aligned so its corners touch the midpoints of the outer square’s sides.
Second Rule:
LHS: Draw a black square.
RHS:
Copy the black square.
Change the outer square’s layer to blue.
Draw a smaller black square inside as before.
Finalize in the Main Block:
After the jump rule in the
mainblock, add a rule to change all green and blue lines back to black.
Key Points
Looping with Jump Rules: Setting the loop count in a jump rule allows you to repeat entire blocks.
Part 3: Conditional Jumps
Conditionals jumps add an additional layer of control to DrawScript. With these, you can
tell Shape Machine to take a jump only if a condition is met. Just like regular jump
rules, conditional jump rules dedicate the right-hand side to the TextDot label indicating
the jump target. The difference is that now the left-hand side can contain conditional queries.
Conditional Queries
Conditional queries are used within the LHS of a jump rule to specify conditions that must be satisfied for the jump to occur.
- Types of Conditional Queries:
Conditional-True Query: The jump occurs only if the specified shape is found anywhere in the design.
Conditional-False Query: The jump occurs only if the specified shape is not found anywhere in the design.
Conditional queries are defined by rectangles that can appear in the left-hand side of a jump rule.
The layer that the rectangle is in determines the type of query (as seen above). If the rectangle is
in the conditional_true layer (bright green), it is a conditional-true query.
If the rectangle is in the conditional_false layer (bright magenta), it is a conditional-false
query. Inside the rectangle, you can place the shape that Shape Machine should look for
the presence or absence of prior to making the jump.
In addition to the shape that Shape Machine should search for, conditional queries contain
a text element that can be used to indication the transformation to use when searching
for the query shape. This is specified in exactly the same way as the transformation
parameter in the replacement rules of a rule sequence (see
Rule Sequence Parameters for more details). If this
text element is missing or empty, Shape Machine will assume the default of 1 for
Isometry (both direct and indirect).
Note
Conditional queries can be empty, as seen in the example images. In this case, the following occurs:
Conditional-true queries pass, and the jump is made.
Conditional-false queries fail, and the jump is never made.
This is because the empty shape is a subshape of every other shape, meaning it can always be found within the current design.
Looping Jumps and Conditionals
When a conditional jump rule has a loop count greater than 1, the conditional queries are reevaluated every loop before the jump is made. This could mean that conditions that were met prior to the first jump might not be met after returning from the jumped-to block, and the jump rule will not be taken again.
Implementation Details
With conditional jump rules, the implementation of a program changes slightly from above.
rule_dequeue = [
    (val, i, entrypoint)  # val here is a (rule, loop_count) tuple
    for i, val in enumerate(program[entrypoint].rules, start=1)
]
while len(rule_dequeue) > 0:
    (rule, loops_left), i, block_label = rule_dequeue.pop(0)
    # i and block_label are used to report which rule is currently being run and in what block

    if loops_left > 1:
        rule_dequeue.insert(0, ((rule, loops_left - 1), i, block_label))

    if isinstance(rule, JumpRule):
        # Push all rules in the target block to the front of the dequeue
        if not rule.evaluate_conditions():  # note evaluation every time
            continue
        rule_dequeue = [
            (val, i, rule.jump_target)
            for i, val in enumerate(
                program[rule.jump_target].rules, start=1
            )
        ] + rule_dequeue
    else:
        # Apply the replacement rule
        apply_rule(rule)
Combining Queries
You can combine multiple conditional queries within a single jump rule to create complex conditions.
If multiple conditions exist within the same jump rule, all must be met in order for Shape Machine to take the jump. With this, you can create effectively create all logical operations for use within a conditional jump (predicated on the presence or absence of a shape).
Logical NOT
Relatively straightforward. You can change the layer of the query border from
conditional_true to conditional_false or vice-versa to similate a logical NOT.
Logical AND
Also straightforward. You can put two conditional queries in the same jump rule in order to ensure that both conditions are met prior to jumping.
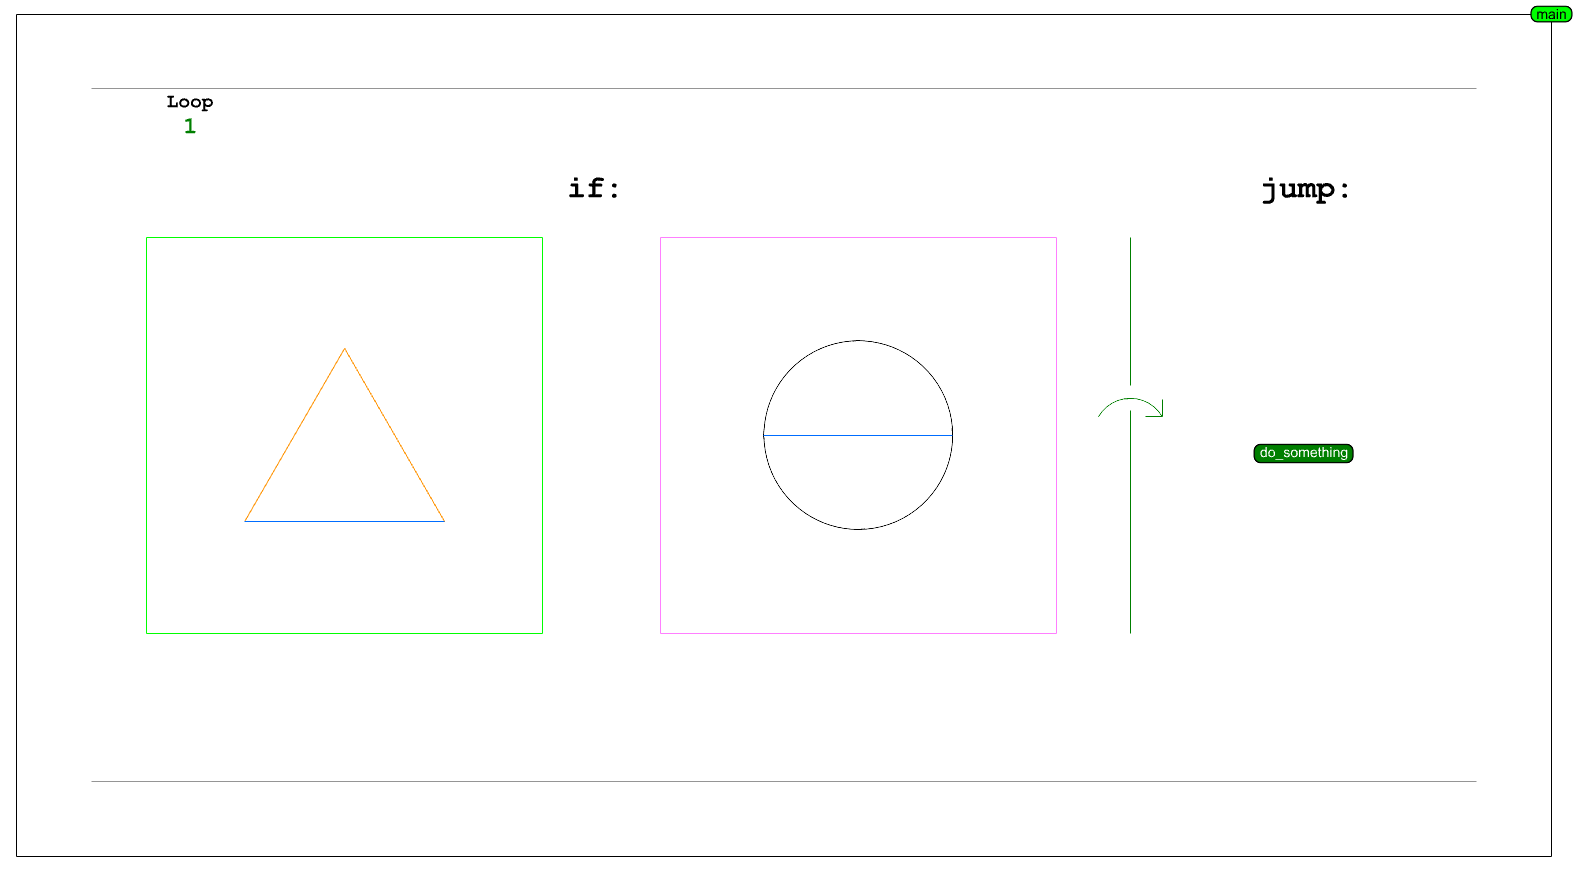
The above image demonstrates searching for both the presence of an orange-orange-blue triangle and the absence of a black circle with a blue diameter. Neither of the queries shown have transformation text, so both conditions are checked with Isometry.
Logical OR
Logical OR takes a few extra steps to create. You need two jump rules, one checking the first condition and another checking the second. To make sure that the jump target isn’t executed twice, the second jump rule can include a negated version of the first jump’s condition.
Alternatively, if the jump target creates geometry that wasn’t present beforehand, the second jump rule could also search for the absence of that created geometry.
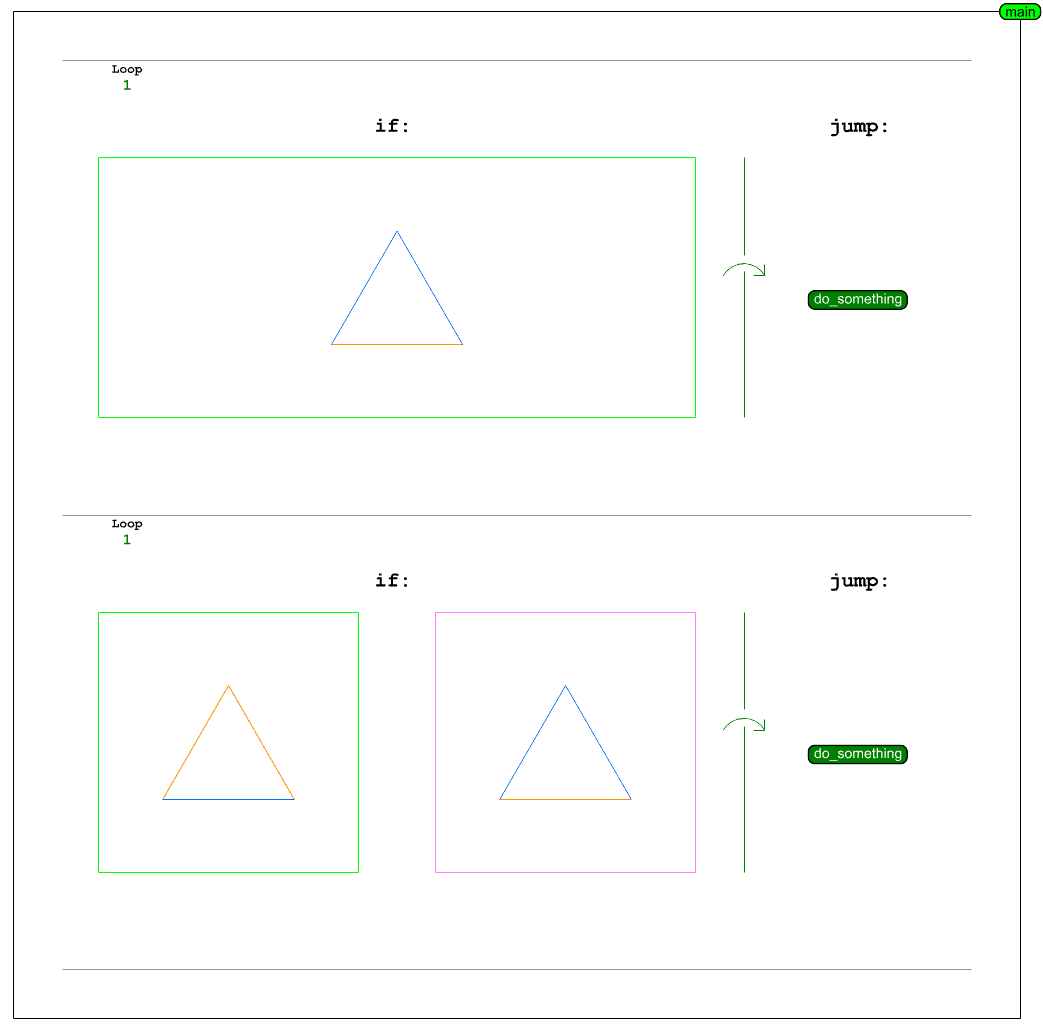
The first image demonstrates searching for a blue-blue-orange triangle before doing something, then looking for an orange-orange-blue triangle and no blue-blue-orange triangles before doing that same something. This lets Shape Machine look for either type of triangle while only doing the something once.
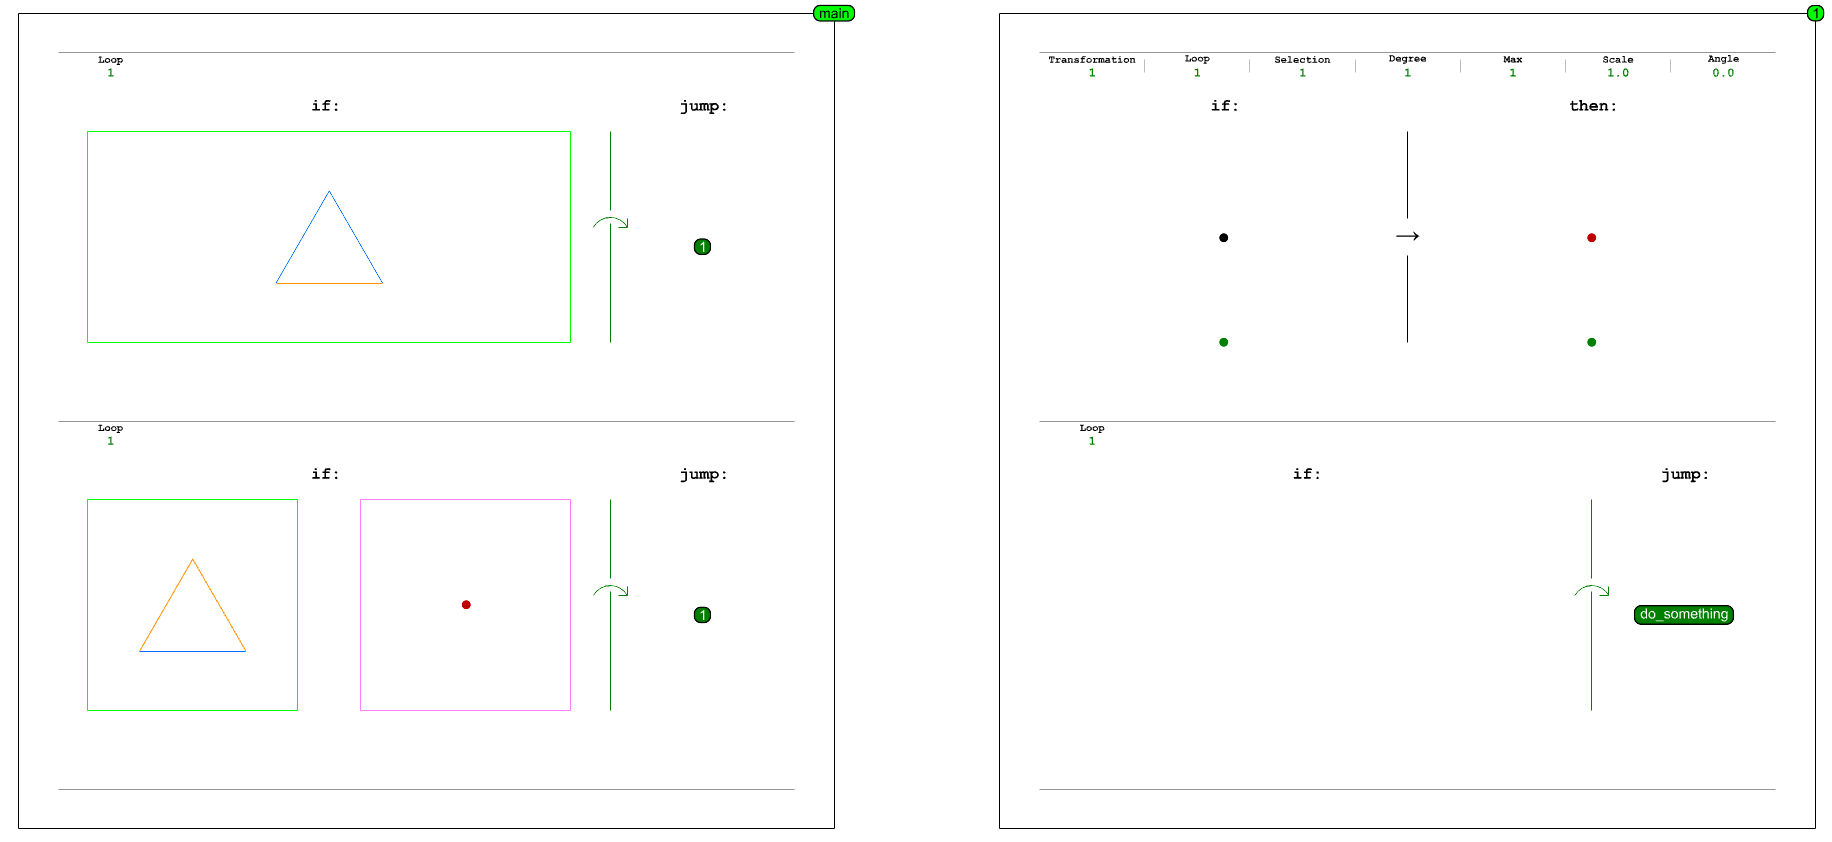
The second image is very similar, except before doing something, a black point
is turned red. This lets Shape Machine instead check for the absence of that red point
in the second conditional jump rule, knowing that if it is found, the do_something
block has already been executed.
In both images, none of the queries shown have transformation text, so all conditions are checked with Isometry.
More Complicated Combinations
More complicated combinations of conditional queries can be made by chaining together jumps across intermediate blocks or in sequence in the same block.
Many times, some of these combinations can be made simpler by introducing a sort of sentinel geometry that can be used to indicate if a partial condition is met. This can be done by using the partial condition in a jump to a block that creates the sentinel geometry. That sentinel geometry can then be found during subsequent jumps.
Example: Maze Solving
Many common programming tasks can be made simpler with DrawScript. Maze solving is one such task. Here, the initial shape is a simple grid-based maze with one solution path. Each cell of the grid has a point in the center.
The idea behind the program is that every dead end is easily recognizable as a grid cell with 3 closed sides. Closing the 4th side and removing the cell’s point shortens (or removes) the dead end and marks the cell as unusable in a solution. Using a conditional query, the program can look to see if more dead ends are in the maze. If so, the process can be repeated.
Once all dead ends have been removed by shortening, the solution path can be generated by connecting remaining cell points and deleting any connections that cross cell walls (in the case of a snaking path).
Part 4: Practice Exercises
Exercise 2: Multi-Colored Nested Squares to a Limit
In this exercise, we’ll modify the DrawScript from Exercise 1: Multi-Colored Nested Squares to continue nesting the squares until a condition is met, instead of using a hard-coded loop count.
Step-by-Step Guide
Modify the Main Block:
Change the loop count of the jump rule in the
mainblock to1.
Add a Conditional Jump:
In the
nest_squaresblock, add a conditional jump rule to the end of the rule sequence:LHS:
Create a conditional-false query.
Place it on the
conditional_falselayer.Inside the query box, draw a triangle with red, blue, and black sides.
RHS: Place a
TextDotwith the labelnest_squares.Transformation Text: Set to
3(affinity).
Set Up the Termination Condition:
To run your program, create a black square with a red line extending right from the square’s center. Do not extend the line all the way to the side of the square.
What will happen now is the nesting will repeat until the nested squares start to intersect with the red line. By searching for the red-blue-black triangle under affinity, we guarantee that once a blue square has been made that touches the red square, the nesting will stop.
Key Points
Using conditional jumps can allow you to more finely control the behavior of your DrawScript program.
Conditional jumps let you ensure certain things about the current state of the design prior to making a jump.
Part 5: Conclusion
In this tutorial, you learned:
The Structure of DrawScript: Understanding blocks, rules, and labels.
Jump Rules: Controlling execution flow with jumps and loops.
Conditional Jumps: Adding decision-making to your programs with conditional queries.
Practical Applications: Creating dynamic and complex designs through iterative and conditional rule application.
DrawScript enhances the capabilities of Rule Sequences by allowing for both:
Named routines, which can be called from other routines
Jump rules, which allow you to control the flow of your program
Glossary
Block: A named sequence of rules in a DrawScript program.
Jump Rule: A rule that directs execution to another block.
Conditional Query: A query that must be satisfied (true or false) for a jump to occur.